 After mounting the tv to the wall and giving the former tv storage a comic book makeover we needed something thin to hold the electronics and movies. Being
 Our new console table is made from all pallet wood with some fence boards mixed in after the stash of pallets was depleted.
This table is completely free.
Pin-spiration:
I have varied collection of ideas saved on Pinterest for pallets, reclaimed wood, fences, etc. Here are the inspiration pieces/sources pulled from my board: working with wood. It'll be fun to add my own creation to this board! And I look forward to putting my own spin on some of the other projects pinned there.
 |
| Source |
 |
| Source |

I took creative liberty in size and length.
The length of the pallet sides determined how long this table was.
The width of the DVD player and X-box determined the width of this table. It needed to be wide enough to hold them but narrow enough to leave a small footprint under the TV.
And the height of the table was determined by the distance between the TV and the floor, leaving room for all the technology we needed to place on top.
This is the BEST part about making one's own furniture: it truly fits your home for your needs.
All other pieces were cut-to-fit and assembled according to the wood. The second shelf I wanted was easily installed on these braces that came with the wood. I just cut the legs the same length based on the braces. Easy peasy.


Sanded and sanded and sanded. I loathe sanding but it is a necessary evil. It was looking much cleaner and I was tempted to leave it as is or maybe add a coat of stain to keep the natural wood look. But our interior decor does not lend itself to all natural wood. The hubs isn't a fan of it so we meet in the middle on a lot on our decorating decisions. It would need paint to complement our living room.

One coat of Kilz primer from top to bottom, including under the shelves. I know they won't be seen, but I want extra assurance against any germs or bacteria that might linger on these planks. It's just a precaution...I've read too many articles on the dangers of using reclaimed wood.

Time for the fun part! Color!
To create a varied color texture without using layers of paint and more sanding, I employed the dip & drag painting technique from Lake Girl Paints. You should hop on over and see how she mixes up colors -- just beautiful!
Below is my interpretation of her method. Sometimes I blended the colors and other times I picked a primary color theme for that plank.

 I used acrylic paint in Tuscan Teal, White, and burnt umber???? I forget. This took ALOT of acrylic paint. Sometimes I didn't like one of the planks and would redo it. Honestly, I would STILL be working on this project if my husband hadn't assured me that the table looked fine as a whole. I couldn't see the forest for the trees as I got sucked into the minute details of color blending on each and every plank.
I tried to pick a favorite plank, but I adore them all!


 The screws looked better before this was painted. I wished I'd taken pics since I'd carefully selected screws with patina (benefit of salvaging screws and nails, much to choose from). The paint undid that in the final look. Originally I was going to use my mini Kreg jig to make pocket holes...but I've only successfully made four pocket holes. I only had two of the long side pallet pieces, I didn't want to risk ruining them. This was not the project to experiment with and I needed to make something quick for staging our home. The end table we were using prior to this wasn't flying with the realtor...seems the "bachelor pad" look isn't enticing to buyers. :)


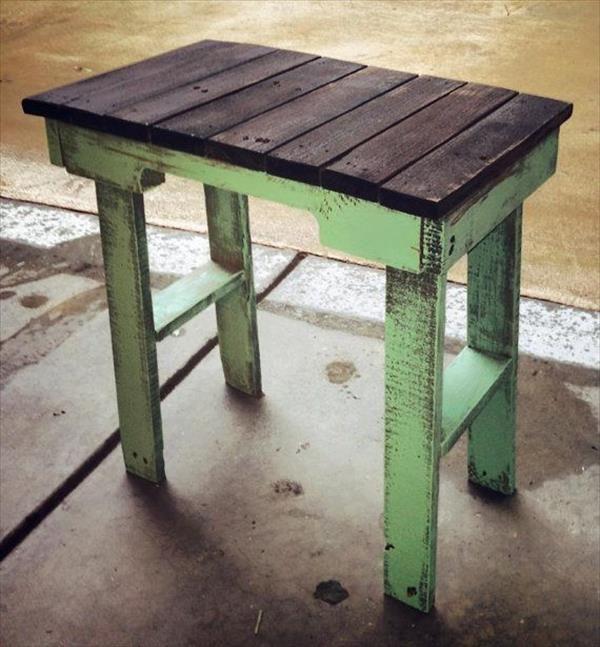
And how it looks in real life.


I am very pleased with how this turned out. Depending on how we arrange furniture in our new home we may not need this under the TV. It could easily be used behind a couch, as a plant stand, mud room oranizer, or if sealed properly, it could be utilized on the covered patio in the back.


This frugally-made table is a win in our home! I'm encouraged to try more...and try out those pocket holes. Like Lowe's motto: Never Stop Improving,I've found my crafty-improvement-goal for the next few months: pocket holes.
Do you have a crafty-improvement-goal?
Pin-spiration

Audra I love this paint technique you have used here. It creates such depth and interest in the table top. I will definitely have to try this idea in the future.
ReplyDeleteLove how this turned out! Thanks for sharing with us at the To Grandma's House we go link party!
ReplyDeleteI've had that table saved to my inspiration folder for years! :)
ReplyDeleteI love your pallet console table. Thanks for sharing at Talk of the Town.
gail
Just beautiful! I too loves Lake Girl Paints style of painting and can see it in your painting as well. Nicely done.
ReplyDeleteBeautiful job, Audra! I love the idea of it and the color. You definitely took the inspiration ideas to the next level. Gorgeous.
ReplyDelete