 |
| my favorite picture of the bunch, so pretty |
Summer is going out kicking and screaming. Last weekend we took our kids to the pumpkin patch in 80degree heat...and of course I didn't bring sunscreen, we brought jackets. After an hour our family wilted and we left in search of ice cold sodas. The persistent warm days make it hard to get into the "fall mood," this includes trading in summery decor for falls muted tones.
 But, a request for a DIY post on frugal redecorating and/or renovating for a #FallFacelift project motivated me to think of oranges, reds, and yellows.
For the #FallFacelift, I chose to give our entry way a makeover.
1. Add More Storage
I believe our town home entry layout was designed for a childless man with a sum total of three pairs of shoes because there is a pittance of space dedicated to "mudroom" storage needs. Especially for a family of five.
If adding more footage or shifting walls to create additional storage was an option, I'd use the Cash Flow & Net Worth Calculator to create a budget. Renovating is out of reach at this address. Fortunately, our budget for storage looks like this:
Free cubby + free fence boards = free storage.
 One of the pros of closing my booth is the plethora of items I get to stage around my home, like this cubby.
This was a basic boring white cubby found discarded on the side of the road. Reclaimed fence boards were sanded and nailed onto the back and all four sides of the cubby. This allows for a uniform look whether it sits vertically or horizontally.
 |
| used as vertical shelves in booth |
Tipped over, its now the perfect shoe and small bag storage. The top is fair game for decor or as a dumping ground for books, bags, and toys.
 |
| photo taken from front door way |
 |
| "Welcome home, I missed you!" |
The hedgehog was a full price impulse buy. He was too cute to pass up!
3. Add a Personalized Touch
This varies from person to person, a family photo, an heirloom or favorite object, or something handmade. For me, its handmade, especially as my kids grow older and assist on projects. Making happy memories. :)
To the left, Dollar Store leaves were sown onto an orange ribbon. One of my boys "helped" use the sewing machine with anxious guidance on my part, and both boys took turns selecting the order of the leaves.
Above, homemade tin can pumpkins add variations of orange.
4. Bring the Outside In
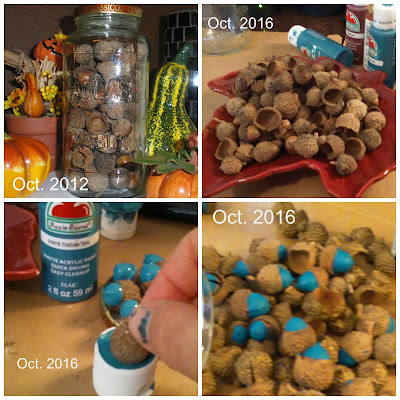
Four years ago, I toasted a bunch of acorns for a small scale vignette, a seriously small scale vignette. I was a little green in terms of decorating and crafting. It was fun to go back and read my old post on a Dried Acorn Arrangement and see how far I've come in prettifying a space.
This jar of acorns hasn't seen much action the past couple of fall seasons so it was time to give it a face lift of its own.
 |
| I clearly value painting acorns over painting my nails. Is there a hashtag for expired manicures? |
One of the steps in creating the dried acorns the first time was to seal them to preserve the color. For four years these acorns were sealed up tight, and once that lid was screwed off, the odor of spray sealant permeated my work space. I don't think these acorns are going to fade anytime soon! Pe-yew!
The empty acorn "hats" were painted in a metallic brown. The "heads" (they look like a head with a hat, right?) were painted in my current favorite acrylic color: Tuscan Teal, but their "hats" were left natural for color variation.
They look so pretty displayed on these layered leaf plates. Which brings me to my last step:
5. Vary the Colors
Personally, I'm not a fan of monochromatic spaces. They look clean and sharp, but to me they appear uninspiring, boring even. I've mentioned already where I added color variation (the tin can pumpkins, the painted acorns). Some people follow the 60-30-10 color rule for interior decorating but I try to avoid math whenever possible. My use of color ratios is whim based.
I do, however, like to employ complementary colors and used the below color wheel as a loose guideline.
 |
| source |
Now to train the kids to toss their shoes into their designated cubby instead of heaping them onto the closet floor!
#FallFacelift


Comments
Post a Comment